Abrasive Wheels - Bench and Pedestal Wheel Mounting
On this page
How should you mount an abrasive wheel?
Back to top- Follow the manufacturer's recommendations when handling, grinding, maintaining and storing abrasive wheels. An operator must be fully trained and instructed in the safe use, care, and protection from abrasive wheels before use.
- Lock out and tag out all machines before making any repairs. Disconnect machines from their power source before changing the abrasive wheel.
- Ensure you have the correct type and size wheel for the machine by checking the markings on both.
- Select the proper abrasive wheel and machine for the job. Consider the material, the finish quality, and the contact area of the wheel.
- Check and make sure that the machine spindle speed is not greater than the maximum operating speed marked on the wheel.
- Examine the wheel for cracks or chips (visual inspection) to ensure the wheel is in safe condition and perform the "ring test." Replace the wheel, if faulty.
- Inspect the machine and its guards. Do not use a damaged machine, or one with the guards damaged or removed.
- Do not force a wheel onto the machine spindle or change the size of the mounting hole.
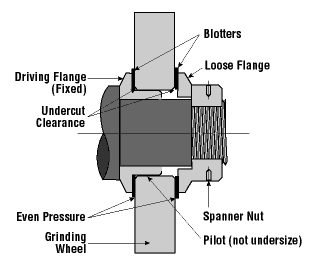
- Maintain even pressure from both flanges against the sides of the wheel. Check flanges with a straight edge. Worn or warped flanges must not be used.
- Maintain a clearance (undercut relief) of at least 3 mm (1/8 in.) to prevent pressure on the wheel near the hole.
- Check the surface of the abrasive wheel and flanges to ensure that no particles are present.
- Use proper mounting blotters between a wheel and flanges to take up slight wheel surface roughness when required or supplied by the manufacturer. Do not reuse blotters and only use one blotter for each side of the wheel.
- Ensure mounting pilot(s) is rounded with length about 2/3 width of the wheel.
- Extend the threaded section well inside the loose flange.
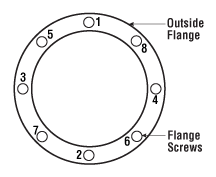
- Tighten grinding wheels just enough to prevent them from slipping. Over tightening the spindle nuts or clamping screws can damage the wheel and grinder parts. With multiple screw mounting flanges, tighten the bolts uniformly. Start by barely tightening a screw, "snug-up" opposite screw and, in a crisscross manner, continue until all mounting screws are uniformly tight.
- Place the threads of the central spindle in the direction that allows the nut to tighten because of the force of the work being done.
- Ensure all safety guards are in place and properly tightened.
- Wear appropriate personal protective equipment (e.g., eye protection with side shields/full face shield, respiratory protection, protective clothing such as an apron or long-sleeves and well-fitting gloves, and hearing protectors).
- Do not wear loose clothing, dangling jewellery and make sure that loose hair is tied back properly.
- Ensure work area and floor are clean.
- Before turning on the power, the operator should turn the wheel by hand to check for appropriate wheel clearance.
- Warn all persons to stay clear of the area where the wheel is used.
- Stand to one side and test the wheel. Start and run the wheel for at least 1 minute. If any undue vibration occurs, switch off immediately and make adjustments. Never adjust moving machinery.
- Fact sheet confirmed current: 2023-08-31
- Fact sheet last revised: 2022-04-27