Lighting Ergonomics - Survey and Solutions
On this page
- What are some of the most common lighting problems?
- What are other OSH Answer documents about lighting?
- What should you know about insufficient light?
- How much light is needed for various situations or activities?
- Should the surrounding environment be considered?
- How do you test and correct for insufficient light problems?
- What should you know about glare?
- How do you detect glare?
- How do you correct glare problems?
- How can you detect if there is "improper contrast"?
- How do you check and correct for poor contrast?
- What should you know about poorly distributed light?
- How do you conduct a more detailed lighting survey?
What are some of the most common lighting problems?
Back to topPoor lighting can cause several problems, such as:
- Insufficient light – not enough (too little) light for the need.
- Glare – too much light for the need.
- Improper contrast.
- Poorly distributed light.
- Flicker.
This document summarizes ways to detect and solve common lighting problems.
What are other OSH Answer documents about lighting?
Back to topPlease also see:
What should you know about insufficient light?
Back to topPoor lighting can be a safety hazard – misjudgment of the position, shape or speed of an object can lead to incidents and injury.
Poor lighting can affect the quality of work, specifically in situations where precision is required, and overall productivity.
Poor lighting can be a health hazard – too much or too little light strains eyes and may cause eye discomfort (burning, etc.) and headaches.
How much light is needed for various situations or activities?
Back to topThe amount of light we need varies and depends on:
- Type of task being done (such as demands for speed and accuracy).
- Type of surfaces (does it reflect or absorb light).
- General work area.
- Individual's vision.
The amount of light falling on a surface is measured in units called lux. Depending on the factors noted above, adequate general lighting is usually between 500 and 1000 lux when measured 76 cm (30 inches) above the floor.*
Examples of industrial and office tasks and the recommended light levels are in the table below.
| Recommended Illumination Levels* | |
|---|---|
| Type of Activity | Ranges of Illuminations (Lux)** |
| Public spaces with dark surroundings (e.g, parking lots, building exteriors, outside areas, basement areas that house machinery but are not regular task areas) NOTE: Areas of higher activity, such as frequently used walkways or building entry and exit points should be at least 54 Lux) | 20-50 |
| Simple orientation for short temporary visits (e.g,. inactive storage areas, waiting areas, or log loading and unloading) | 50-100 |
| Working spaces where visual tasks are only occasionally performed (e.g., stairways, freight elevators, truck loading, or active bulk storage) | 100-200 |
| Performance of computer tasks (range due to screen types and polarity) | 75-300 |
| Performance of visual tasks of high contrast or large scale (e.g., reading printed materials of good quality, simple assembly, rough lumber grading, benchwork, etc.) | 200-500 |
| Performance of visual tasks of medium contrast or small size (e.g., reading medium-pencil handwriting and poorly printed or reproducted material, mail sorting, hair styling, kitchens, vehicle repair shops, medium banch or machine work, fine hand painting and finishing, fine woodworking and finishing, etc.) | 500-1000 |
| Performance of visual tasks of low contrast or very small size (e.g, reading handwriting in hard pencil on poor quality paper or very reproduced material, difficult inspections, difficult assembly tasks, weaving, etc.) | 1000-2000 |
| Performance of visual tasks of low contrast and very small size over a prolonged period (e.g., very diffcult assembling tasks, sewing, fine bench or machine work, extra-fine hand painting and finishing, etc.) | 2000-5000 |
| Performance of very prolonged and exacting visual tasks (e.g., very detalied cloth inspection or examination) | 5000-10000 |
* From: IESNA Lighting Handbook. 9th ed. Illuminating Engineering Society of North America, 2000. p. 10-13, CSA Z412:24 Office ergonomics - An application standard for workplace ergonomics, and British Columbia Occupational Health and Safety Regulations, Section 4.65
**Lux = Lumens (quantity of light) per square metre.
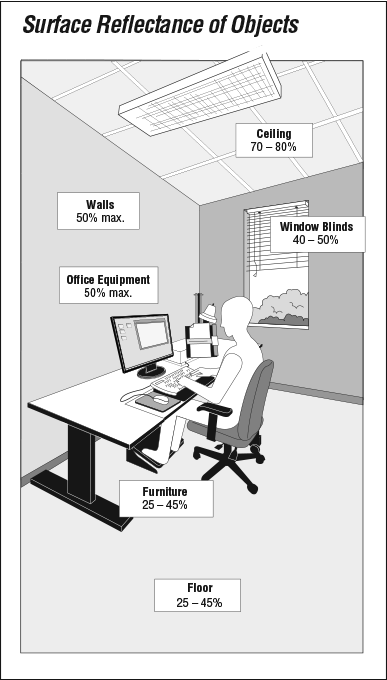
Should the surrounding environment be considered?
Back to topYes. To reach proper light levels and uniform light distribution in the visual environment, many light fixtures are designed to reflect light off walls, ceilings and objects. The amount of light reflected off a surface can be measured. Suggestions for the percent of light reflected off surfaces in a typical office include:
- Window blinds (40-50%).
- Walls (50% maximum).
- Business machines (50% maximum).
- Ceiling (70-80%).
- Floor (20-40%).
- Furniture (25-45%).
The percent value refers to the amount of light that a surface reflects relative to the amount that falls on the surface. To minimize glare, consider using work surfaces (such as the desk or documents) that are matte (less reflective) where possible.
In addition, light fixtures that are too widely spaced or wrongly positioned can create shadows. Objects between the light fixture and the work being done can block the light and cast shadows. Likewise, workers sitting with their backs to windows, with light fixtures directly overhead or to the rear, cast shadows on their own work surfaces.
How do you test and correct for insufficient light problems?
Back to topTo detect insufficient light, try the following:
- Measure the average illumination throughout the workplace. Compare this to the recommended levels.
- Look for shadows, especially over work areas and on stairways.
- Ask workers if they suffer from eye strain, squint to see, or get frequent headaches.
Workers should sit in their normal working positions during measurement to give accurate results. Determine the type, speed, and accuracy needed to do the task. Take into account individual factors, such as workers' age and vision needs, as well as any visitors or clients who may need to perform tasks.
To correct insufficient light:
- Replace bulbs on a regular schedule. Old bulbs give less light than new ones, so replace them before they burn out. Follow manufacturers' instructions.
- Clean light fixtures regularly. Dirt on light fixtures reduces the amount of light given off. Light fixtures with open tops allow air currents to move dust up through the fixtures so dust and dirt do not accumulate on them.
- Add more light fixtures in appropriate places.
- Paint walls and ceilings light colours so light can be reflected.
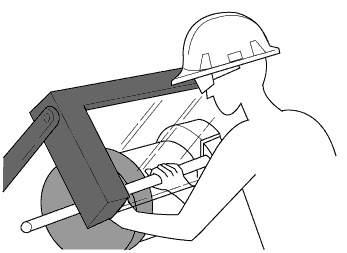
- Use more reflected light and local lighting to eliminate shadows. For example, a covered light mounted under a transparent guard on a grinding wheel provides the added light needed to clearly see the task.
- Do not position the work station with the light fixture directly behind worker.
What should you know about glare?
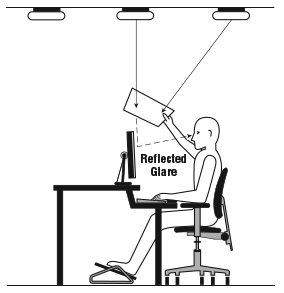
Back to topGlare is a common lighting problem. Glare is what happens when a bright light source or reflection interferes with how you are 'seeing' an object. In most cases, your eyes will adapt to the brightest level of light. When this adaptation happens, it becomes harder to see the details in the duller or darker areas of the work space (even though they are actually sufficiently lit). Glare can cause annoyance and discomfort, and can actually decrease a person's ability to see.
Reflected glare is caused by:
- Light reflected from polished, shiny or glossy surfaces.
- Glass on picture frames or windows at night.
- Monitors or screens.
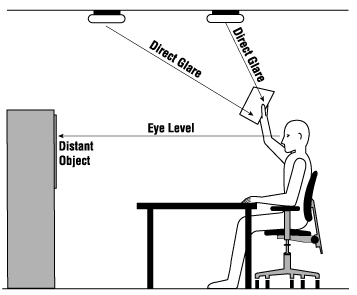
Direct glare is caused by:
- Very bright light from poorly positioned light fixtures.
- Sunlight.
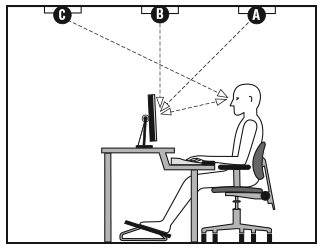
How do you detect glare?
Back to topThere are several ways to find sources of glare.
- When in your normal working position, look at a distant object at eye level. Block the light "path" from the fixtures with a book or cardboard. If the distant object is now easier to see, the light fixtures are probably producing glare.
- To detect reflected glare, look at the task from your normal working position. Block the light falling on it from the front or above. If details are now easier to see, reflections are a problem.
- Place a small mirror face up on the work surface. If the mirror reflects light from above, the light fixture is responsible for glare.
- Look for shiny objects that reflect light. Glass in picture frames, glossy table tops, monitors or screens are common examples.
- Ask workers if they experience sore or tired eyes, headaches or if they need to squint to see.
How do you correct glare problems?
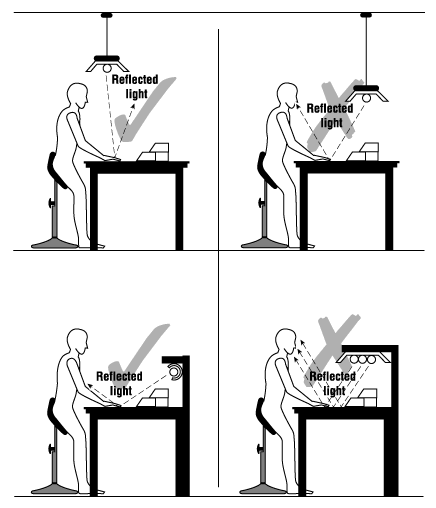
Back to topTo correct glare, try:
- Using several small low-intensity light fixtures rather than one large high-intensity light fixture.
- Using light fixtures that diffuse or concentrate light well. Indirect light fixtures or direct light fixtures with parabolic louvres are two possibilities.
- Using indirect lighting or a combination of direct and indirect lighting.
- Covering bare bulbs with louvres, lenses, or other devices to control light.
- Increasing the brightness of the area around the glare source.
- Using adjustable local lighting with brightness controls.
- Positioning light fixtures to reduce reflected light that is directed toward the eyes.
- Using low gloss paper or applying flat or semi-gloss paint and matte finishes on 'offending' surfaces.
- Making sure there are no bright spots or light patterns that may bother the worker.
- Removing highly polished and shiny objects.
- Keeping general lighting levels at recommended levels.
- Positioning the work station so that windows and fluorescent light tubes are parallel to the worker's line of sight.
- Positioning the work station so that the light fixtures are NOT in the front or directly overhead.
How can you detect if there is "improper contrast"?
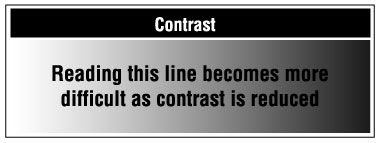
Back to topThere are two types of contrast problems – the first occurs when there are very different light levels from one area to another, and the other occurs when there is contrast between the colours of objects.
The immediate work area should be brighter than surrounding areas. If the surrounding area is brighter than the work area, your attention will be distracted away from the work area.
The contrast between colours of objects, such as between the print itself and paper, or text and background on screens, can also cause problems. Too little contrast between print and the paper – or characters on a screen and the background – makes reading tasks difficult. In an industrial setting, an example would be that moving and stationary machine parts are hard to distinguish if they are the same colour, or when colour matching is critical (such as choosing fabrics or paints).
How do you check and correct for poor contrast?
Back to top- Look for areas with great differences in light levels.
- Look for objects that are hard to distinguish from the background.
- Look for reading materials and monitors where it is hard to make out the print or characters from the background.
To correct for poor contrast:
- Increase the contrast between objects and the background. Use ink pens rather than pencils, and white paper rather than grey.
- Adjust the monitor's brightness and contrast controls.
- Decrease reflected glare. Use matte finishes on surfaces, and move or cover shiny objects.
- Use contrasting colours for objects and the background. Paint stationary and moving machine parts in contrasting colours to improve visibility.
What should you know about poorly distributed light?
Back to topWhen light is poorly distributed, parts of the ceiling and general surroundings will seem dark and gloomy. Substantial differences in light levels force your eyes to readjust when moving from one light level to the other. Workers may find it difficult or impossible to see properly.
You can detect poorly distributed light by:
- Looking for dark areas and uneven lighting.
- Using a light meter to check the illumination at various points throughout the workplace. With uniform general lighting, the minimum reading should not be less than two-thirds of the average value.
Correct for poorly distributed light by:
- Supplementing or replacing light fixtures with ones that distribute some light upwards.
- Painting ceiling and walls in light colours that reflect light.
- Cleaning ceilings, walls and light fixtures.
How do you conduct a more detailed lighting survey?
Back to topA complete lighting survey may be needed to identify and solve more subtle or complicated problems. A complete lighting survey requires complex equipment and practical experience.
Follow the manufacturer's instructions for the proper handling, care, and maintenance of instruments. Many different techniques and instruments are available. Each of them has its own advantages and disadvantages.
A checklist is available in OSH Answers under "Lighting Ergonomics".
A complete basic lighting survey includes the following:
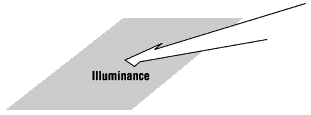
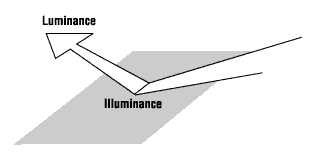
Illuminance
Illuminance is the amount of light falling on a surface. The unit of measurement is lux (or lumens per square metre = 10.76 foot candles, fc). A light meter is used to measure it. Readings are taken from several angles and positions.
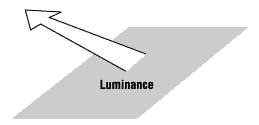
Luminance
Luminance is the amount of light reflected from a surface. The unit of measurement is candela per square metre (equals 0.29 foot-lamberts). An illuminance meter is used to measure it. Several measurements are made and averaged. Luminance tables are consulted for reference values.
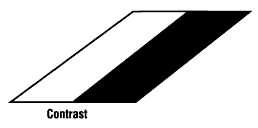
Contrast
Contrast is the relationship between the brightness of an object and its background. A luminance meter is used to measure it. The following formula is used to calculate contrast and provides a number between 0 and 1. The average contrast should be above 0.5:

Reflectance
Reflectance is the ratio of light falling on a surface to the light reflected from a surface, expressed as a percentage. A light meter is used to measure it. Reflectance can also be measured using a reflectometer or by comparing the surface of interest with colour chips of known reflectance.
To determine reflectance, the light meter probe is placed on the test surface to measure light falling on the surface. Next, place the probe 5-7 cm away facing the surface to measure the light reflected from the surface. The following formula is used to calculate reflectance:
- Fact sheet last revised: 2025-08-11